 Enter the Guards setup and strategy
I am a total neophyte when it comes to the Lock ‘n Load Tactical series of games and so I decided to pick a more basic scenario for my initial AAR. Enter the Guards from Heroes of the Motherland is an excellent scenario for anyone who is new to Lock ‘n Load Tactical. It is a single map, there are no multi-floor buildings and the setup is largely enforced by the scenario so you don’t have to worry about making rookie mistakes that end the game quickly. Which is something that I obsess about when I start learning a new game. I quickly fall out of that habit and make all sorts of silly mistakes later on as any of my opponents will attest.
The scenario is set in Stalingrad and sets elements of the German 29th Infantry Division against Soviet forces drawn from the 35th Guards and the 131st Rifle. As fitting a Stalingrad scenario, the forces are facing off across a street with the Soviets packed into their jumping off points.
SSRs
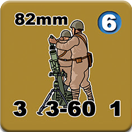
The first two SSRs reduce the game complexity by removing Smoke and multi-story buildings from the game. Soviet half-squads can’t combine but German ones can. Given that there are two German half-squads in the game and they are on opposite sides of the map this isn’t really an advantage for the Germans. The German hero Asier has some additional abilities for his The Ambush skill that lets those units generated by the skill to fire or enter melee and also lets Asier trigger it when he enters Melee.
SSR 6 stipulates that there is no LOS from 49b D2 and 49b J1 in this scenario. There is a typo in the current scenario writeup that says 49b J2 but there is clearly no LOS between D2 and J2. This rule was added after Heroes of the Motherland received its own map and no longer used map 18 from Heroes of Normandy where the scenario was titled Not One Step Back.
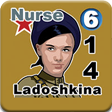
SSR 3 adds some flexibility for the deployment of the Soviet 82mm mortar team and this is the first deployment decision in the game.
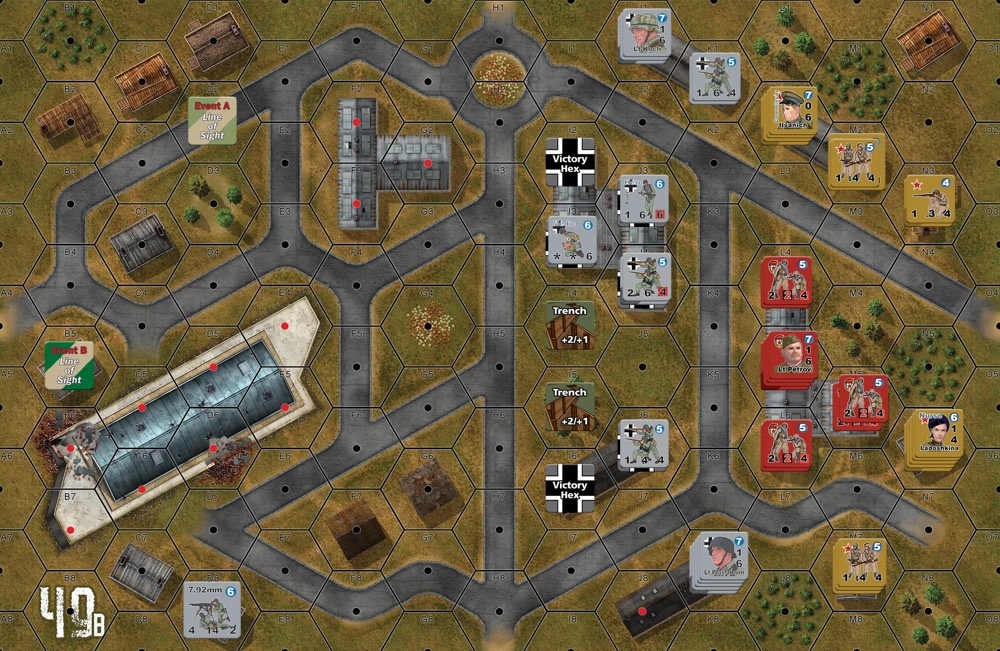
Soviet deployment
The Soviet mortar team can set up in, and fire from, a building hex and has to deploy anywhere east of hexrow K. There are four different buildings that the team can be placed in if you want to take advantage of this additional ability. The question is whether putting it in a building is in the Soviet player’s best interests. With the exception of M5 all of the available building locations are in the LOS of German units and will be susceptible to fire. The 82mm mortar also has a minimum range of three hexes and placing it in some of the buildings would restrict it from firing on the German troops in J4, J6 and K7. Placing it in N7 or N3 would avoid this but N7 would be potentially overstacked and N3 is in easy LOS from J3 and J4 which brings more potential fire onto the mortar team.
The building in N1 is a possible location but it lacks LOS to most of the map and so would require indirect fire to be called in by one of the two Soviet officers. Even the hexes ‘behind’ the staging area of the Guards infantry (M4 and N5) are troublesome as there is clear LOS from the German units in K1 and not much cover. The building in M5 may be a good location to place the mortar team. It has no immediate threat of German fire and it is close to one of the Soviet leaders. Do note that Weapon Teams have different Indirect Fire rules than a Mortar Support Weapon and they have to rely on a Leader or Scout to call in fire. Placing it there would require a Leader to call in fire and one has to assume that Lt Petrov will be busy with other things during the game. Hex M2 seems as if it would be a better location. It has direct LOS to building J4 and while there are options for the Germans to fire at M2 it is not going to be high on their list of targets.
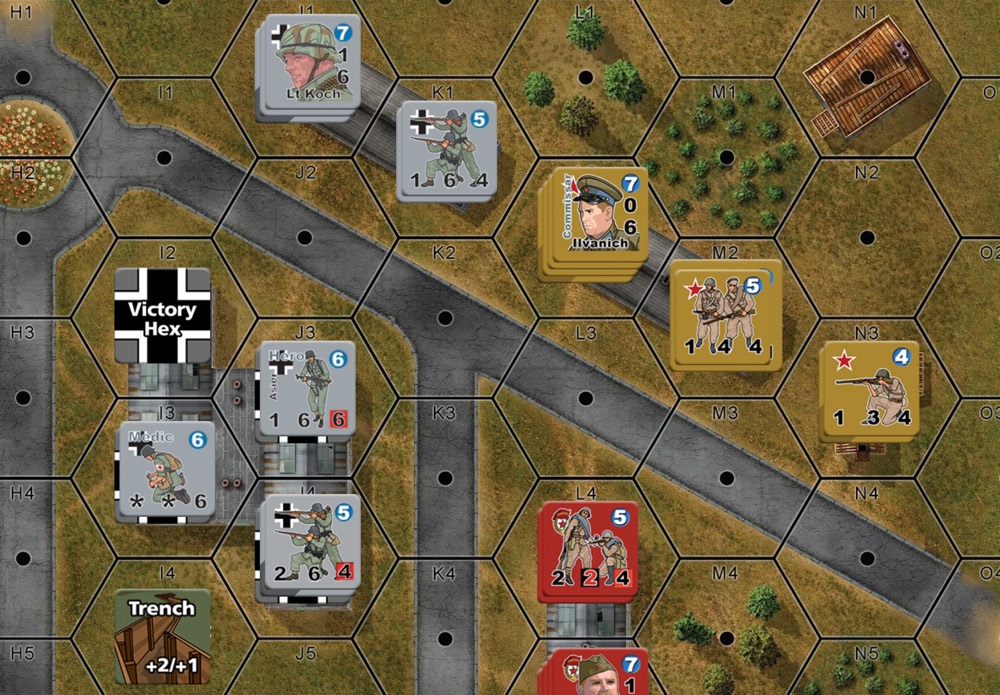
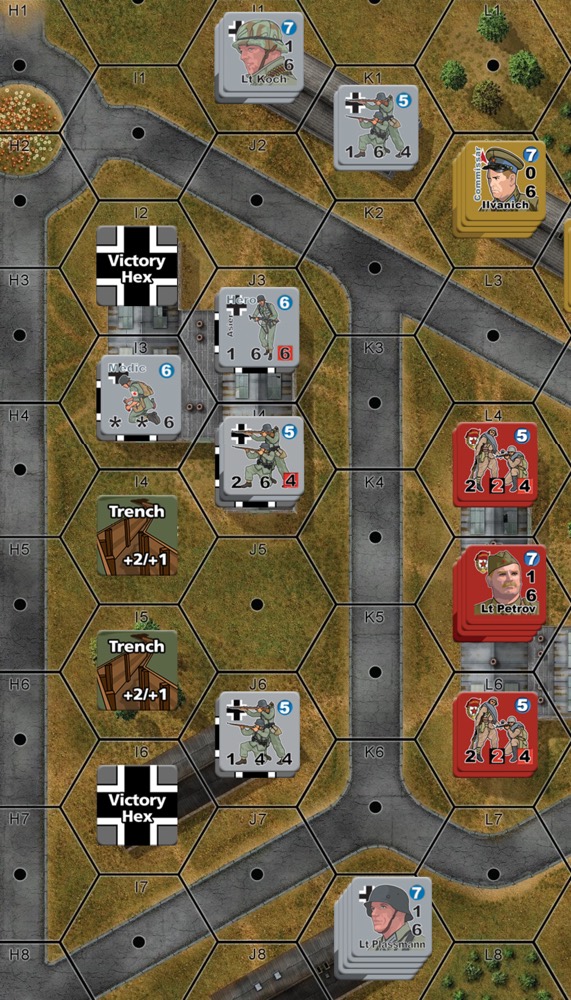
The rest of the Soviet deployment is mandated by the scenario rules and the only real questions you have left are where to put the Leaders and the Support Weapons. Commissar Ilvanich and his troops in building M2 are a bit of a problem. They are adjacent to a slightly more effective group of German troops in building J1. The Soviets have initiative in the first turn and they can either fire or move into Melee against any German forces that are deployed into K1. If they don’t take that opportunity it is a fairly safe bet that the Germans will do so with their first impulse. K1 or L2 will be the scene of attacks and I think that Commissar Ilvanich should be deployed into L2 in order to rally any Soviet units that are Shaken. He won’t provide any benefit to fire or a Melee but he will keep the hex in good order (GO) especially with his 7 Morale and the (11.7.1) Fight or Die! rule. An alternate deployment is to keep Ilvanich and two squads in M2 and then move into melee in K1 if any of the units in the hex get Shaken by Direct Fire.
Lt Petrov and the Guards deploy into building L4 with only a Satchel Charge to supplement their own fire and elan. Given the number of German units that can fire into hex L4 it seems prudent to keep Petrov and the Satchel Charge out of that hex. Placing Petrov in L5 puts the entire building in his Leadership Range.
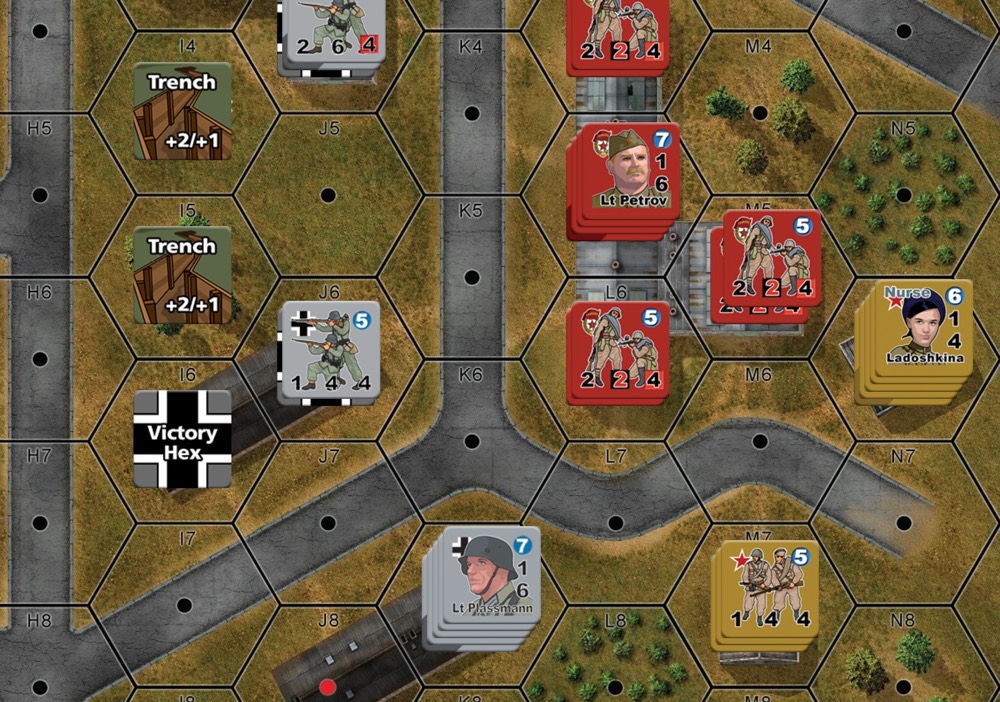
Nurse Ladoshkina
A Nurse (11.10) is a very handy SMC to have at hand. Especially if you are expecting to take a lot of casualties or have a lot of Shaken units. She starts in N6 with a collection of Soviet troops and a Support Weapon. Where she ends up will depend on how poorly the Soviet attacks are in the centre or south of the map. She serves the same purpose as the German Medic but she will have to cover a lot more territory and be more mobile. Which makes her, or more accurately the hex she is in, targets for German fire.
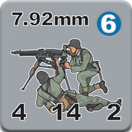
Mortar Weapon team
The Soviet Mortar Team has a Firepower of 3. It rolls 2D6 and keeps the highest value which will, on average, result in a roll of 7.47. Let’s call it 7.5. A German unit in an HC building will be rolling 1d6 + 4 which, on average, will result in a roll of 7.5. A stalemate. The Mortar Team can potentially do some harm but it will not happen as often as the Soviet player would like and so the Mortar Team might be best suited for hitting hexes with Shaken troops or simply trying to irritate the Germans.
German deployment
Three of the German elements are required to be set up in the exact hexes listed in the scenario. In addition, the MG Weapon Team deploys into building D8 which is just a single hex so it has no options either.
Hero Asier and the sparse defenders of building J4 are rather simple I think. The tripod MG 42 and one squad go into hex J4, Asier goes into J3 and the Medic stays safe in I3. This allows the Germans to occupy three of the four hexes. Putting the MG 42 into J4 allows it to cover more on the street and potentially interdict more Soviets. Keeping the Medic in I3 limits the amount of possible fire it might encounter. I suspect that the Medic is going to be critical to the German player holding as many hexes of building J4 as they can.
Lt Koch in J1 has the same set of problems that his Soviet counterparts in M2 have. The question for the Germans is whether they want to try to hold K2 or to counterattack and retake it from the Soviets. Also, what is the intent of the troops there? Are they meant to help interdict the roads around building J4 or do they want to attack the Soviets and try to put pressure on their flanks and help slow down the inevitable assault into building J4? I think that one plan is to put the two squads in K1 to force the Soviets to try to waste time to take the hex and then put the half squad, MG 34 and Koch in J1 to provide more Opportunity Fire at any Soviets attacking across the streets into building J4.
Hero Asier
SSR 6 provides some interesting options for placing and using Hero Asier. His The Ambush skill can be triggered in a Soviet impulse and any troops that result can Opportunity Fire or enter Melee. At his current position of J3 he could trigger his ability when any Soviet units entered J2, K2 and K3. He can also trigger when Soviet units enter J3 or J4 and have troops enter Melee to totally wreck any calculations the Soviet player has made for their assaults.
The MG Weapon Team
One remaining quandary for the Germans isn’t a deployment issue but a question of usage. The MG Weapon Team in D8 is five hexes from the nearest Victory Hex and also only has two MP. It won’t be going very far if it wants to have an impact in the game so it needs to find a nearby hex to use to provide the most firepower it can.
Moving into hex E6 allows it to put fire onto the street at K4 and also fire into J4 if the Soviets take those hexes. Moving to F8 allows it to control the intersection at K6, the street at L7 and the building hex L6. The Soviets don’t have any units or weapons, except for the DP 28 that is in hex N6, that can fire at the MG Weapon Team so while it might seem odd placing it in the middle of a road is probably the best place for it.
Winner, winner…
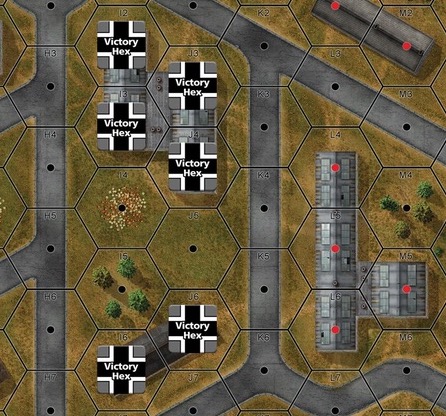
The victory conditions are very straightforward. There are six Victory Hexes which are each worth 3 VP. The Germans start in control of all of them. Each side also gets 1 VP for each MMC or SMC eliminated and 1/2 point for each Squad reduced to a half-squad.
The Victory Hexes are worth 18 VPs and there are 21 points of potential Soviet casualty points and 13 points of potential German casualties on the board. The German player can try to hold on to a few Victory Hexes and then rack up points via Soviet casualties but the Soviet player needs to push the Germans off as many Victory Hexes as they can to get a win and also to keep the Germans from winning by attrition. That will require a deft hand on the part of the Soviet player. They have more units than the German player but they also have to cross streets without cover. Hardly a process conducive to avoid losses.
While the victory conditions are simple the Soviet path to them is much more complicated. The street, from K2 to K6, is a deathtrap. Claiming those locations will be difficult since the scenario allows for no smoke placement. And as anyone who played The Guards Counterattack from Squad Leader will attest, running across the street with no cover is high up on the list of ‘Bad Ideas’. This is the Soviet army though so maybe thinning the ranks to achieve an objective isn’t a bad idea?
The Soviets will need their full movement allowance to cross the street and enter any of the German held buildings. There may be a case for having single units Assault Move into the streets to force German Opportunity fire on weaker targets or to try and force the German Hero to use his The Ambush skill before the German player may want to be. The Soviet player can also ‘trickle’ their units across the street to try to waste German firepower and to also spot hexes for other units to fire at.
The street becomes less of a problem if the Soviets can take control of the two buildings, J1 and J8, at the north and south of the map. Lt Plassmann and his troops in K7 can put down a considerable amount of firepower and Lt Koch as well. Their secondary duty is also to stop the German defenders in building J4 from being flanked. Controlling those buildings may give the Soviets a less bullet-filled path to taking the Victory Hexes controlled by the Germans.
Author: Zac Belado
Zac is a wargamer from Edmonton, Alberta Canada. When not trying to figure out a new set of rules or cut the corners on counters he is busy building websites.
You must be logged in to post a comment.